
The Battle of Gingindlovu took place on 2nd April 1879, during the Anglo-Zulu War. It was a crucial engagement in the British campaign to relieve the besieged garrison at Eshowe and ultimately defeat the Zulu Kingdom.
The British relief force, led by Lord Chelmsford, consisted of 5,250 troops, including Royal Navy sailors, 57th Regiment of Foot, 97th Highlanders, 60th Rifles, and the Natal Native Contingent (NNC). The force was well-equipped with two 9-pounder guns, four 24-pound rocket batteries, and two Gatling guns. The Zulu army, commanded by Somopho kaZikhala and Dabulamanzi kaMpande, numbered around 11,000 warriors.
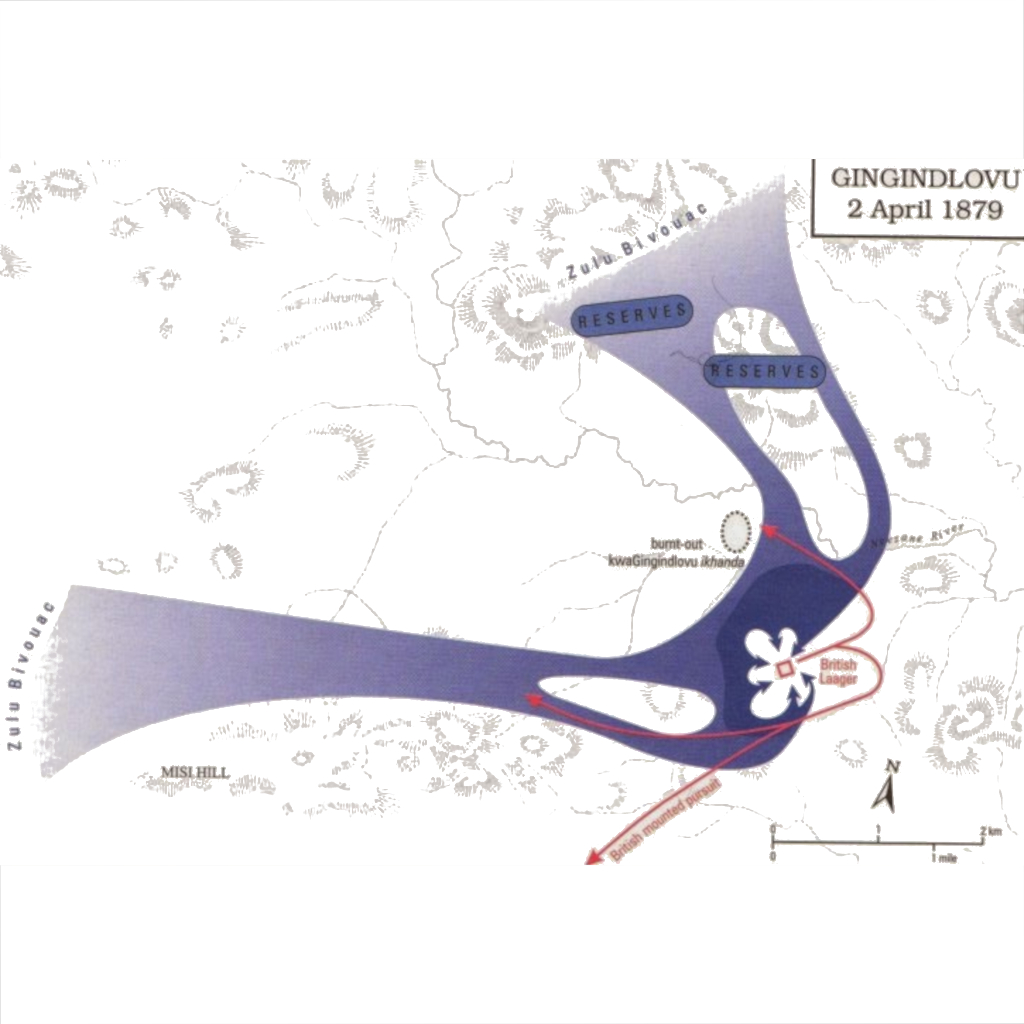
The battle occurred on the south bank of the Inyezane River, where the British forces had established a defensive laager (wagon fort). The Zulu forces launched a series of attacks on the British position, attempting to overwhelm the defenders with sheer numbers1. Despite the intense Zulu assaults, the British forces managed to hold their ground, using their artillery and Gatling guns to inflict heavy casualties on the attackers.
The British defenders suffered 11 killed and 62 wounded, while the Zulu casualties were estimated to be over 1,000 killed. The successful defense at Gingindlovu allowed the British to proceed with their relief mission, ultimately breaking the siege of Eshowe and bringing supplies and reinforcements to the beleaguered garrison1.
The Battle of Gingindlovu was a significant British victory, demonstrating the effectiveness of well-prepared defensive positions and the resilience of the British forces. It also weakened the Zulu army’s ability to defend against further British advances, bringing the British closer to their ultimate goal of defeating King Cetshwayo and subjugating the Zulu Kingdom. The Battle of Gingindlovu
Orders of Battle
British Orders of Battle
- British Commander-in-chief
- Lieutenant General Lord Chelmsford Relief Column for Eshowe
- 1st Brigade, under the command of Lieutenant Colonel F.T.A. Law
- Naval Brigade Artillery from HMS Shah and HMS Tenedos
- 2 x 9 pounder guns and limbers
- 2 x 24 pounder rocket tubes
- 1 x Gatling gun and limber
- Naval Brigade’s contingents from HMS Shah and HMS Tenedos
- 91st (Princess Louise’s Argyllshire Highlanders) Regiment of Foot
- 2 x Companies 2nd/3rd East Kent (The Buffs) Regiment of Foot
- 5 x Companies 99th (Duke of Edinburgh’s Lanarkshire) Regiment of Foot
- 4th Battalion, Natal Native Contingent
- 2nd Brigade, under the command of Lieutenant Colonel W.L. Pemberton
- Naval Brigade Artillery from HMS Boadicea
- 2 x 24 pounder rocket tubes
- 2 x Gatling gun and limber
- Naval Brigade Contingent from HMS Boadicea, detachments of Royal Marines from HMS Boadicea and HMS Shah
- 57th (West Middlesex) Regiment of Foot
- 6 x Companies 3rd/60th (The King’s Royal Rifle Corps) Regiment of Foot
- 5th Battalion, Natal Native Contingent
- Divisional Troops, under the command of Major P.H.S. Barrow
- Jantzi Native Horse
- Mafunzi’s Mounted Natives
- No. 1 Troop Natal horse
- Natal Volunteer Guides
- Native Foot Scouts
Zulu Orders of Battle
- Zulu Commander-in-chief
- Somopho kaZikhala
- Phalane kaMdinwa
- Mbilwane kaMahlanganisa
- Masegwane kaSopigwasi
- Sigcwelecwele KaMhlekehleke
- Prince Dabulamanzi kaMapande
- Mavumengwana
- uVe
- umHlanga
- uMbonambi
- umCijo
- inGobamakhosi
- uNokhenke
- uThulwana
Download This Scenario
How it Played
Sources
Other blog categories that may be of interest. 10mm ACW Project, 10mm AWI Project, 10mm AZW Project, 10mm CGW Project, 10mm FIW Project, 10mm Sci-Fi Projects, Aliens, Dropzone Commander, Terra Nova, 10mm WWI Project, 10mm WWII Project, 10mm Zombie Project, Battle Reports & Scenarios, Making Scenery & Terrain, Painting Guides, Shows & Events, Solo Wargaming, Wargaming Projects, Wargaming Rules.
Leave a Reply