
MappingBoard website was no longer available on the Internet and as it’s one of my favourite programs for making maps I decided to resurrect it. And full credits belong to (Site Design © 2006-2014 Matthew Tyler. Images © 2007 Rob Robbins).
MappingBoard
MappingBoard is an application for drawing wargame maps. I am not a very patient person so the idea is to have a simple, easy to use application where you can, as much as possible, just plonk terrain items down on the map and not have to change a dozen properties such as colour and width every time.
Of course, initially, you will have to set up the toolbox to be able to draw the maps that you wish, but after that, you can just draw a blacktop road with white markings, for example, straight on the map every time you need to.
If you wish to create a library of specific terrain features, such as all the hills in your terrain box, it is as simple as drawing a feature and saving it to a specific folder on your PC and it will automatically appear in the toolbox under “MyFeatures”.
The Science Bit
The main idea behind MappingBoard for drawing linear features, such as the white roads with black borders in the map below, is to have a “drawing feature” that is a combination of “pens” which all draw along the same path on the map producing the desired effect. This simple premise can used to draw roads with borders, tarmac roads with central dashed lines, railway tracks, or dirt roads that fade into the surrounding grass.

Based on the map in the Command Decision scenario Buron by Doug Eaglesham.
Here are Samples of Easy to Draw Terrain Features in MappingBoard

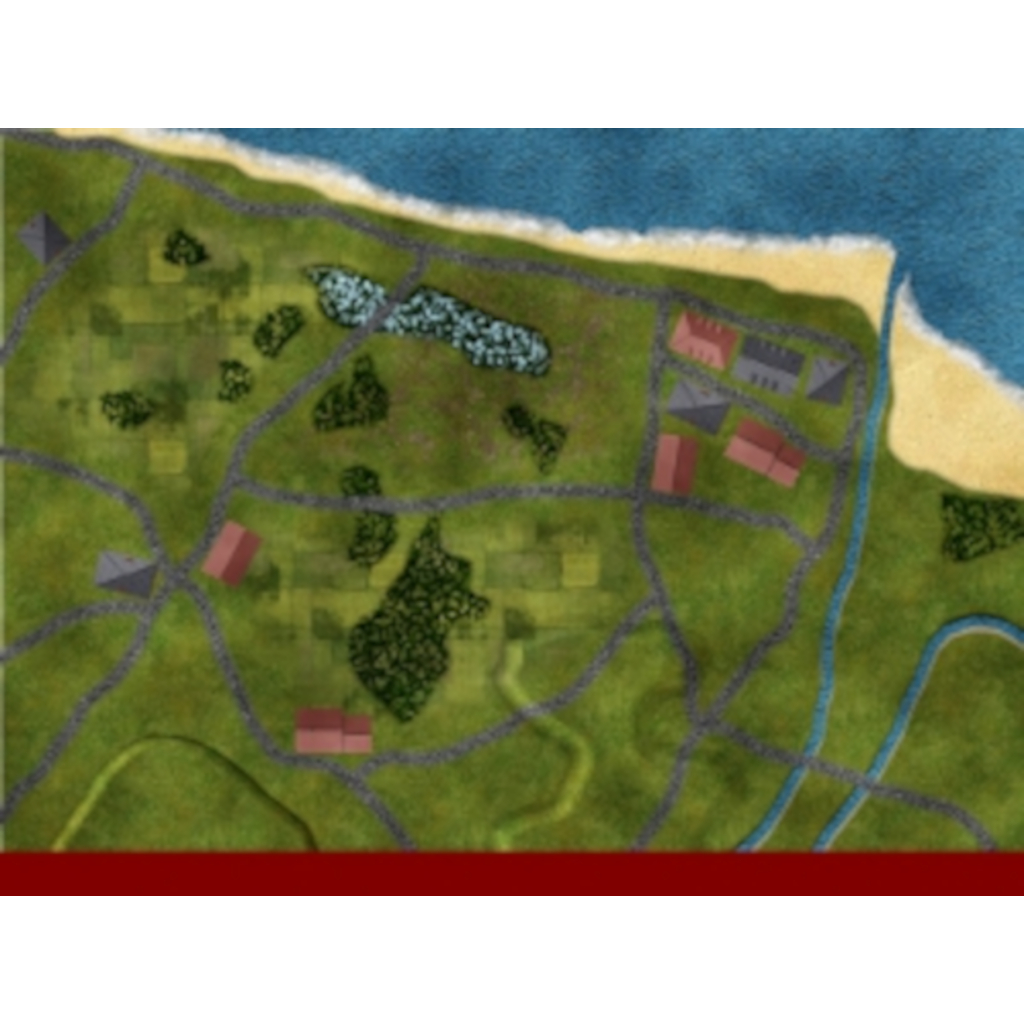
A Map Drawn with Textures
For those who prefer a more Flames of War or Warhammer style of map. I find these very effective for maps with a small number of terrain features.

- The ground textures used in this map were created by David Gurrea
- The water texture was created by AbsoluteCross
- Based on the map in the Rapid Fire scenario Operation “Quick Anger” by Mark Piper, Link no longer working.
A Map Drawn with “3D” Textures
The following map is the same as the above but uses shading to produce a 3D effect.
- The ground textures used in this map were created by David Gurrea
- The water texture was created by AbsoluteCross
- Based on the map in the Rapid Fire scenario Operation “Quick Anger” by Mark Piper, Link no longer working.
More Example Maps
One of the reasons for starting this project was to do my own versions of maps that I found hard to decipher while reading a scenario. Here are some more that I have converted.


The following is a map I drew for the computer game WarTac by Mark Ainsworth.

Textures
I don’t include any textures in MappingBoard. However, there are loads of freely available textures on the internet (I just can’t redistribute them).
- David Gurrea. Some very good grass, soil and cobblestone textures here.
- CG Textures. Lots of very good textures made from photographs
- AbsoluteCross. Abstract textures some of which may be suitable for maps.
- CSUAC Archive. All the mapping objects uploaded to the Dundjinni forums archived in one place. Link no longer working.
- The Vintyri Project. A large collection of buildings – taken from a top down perspective so excellent for maps.
Using Textures in MappingBoard
Maps drawn using textures can look very impressive, especially, as with the map below, when there aren’t many terrain features and a plain map can look a little bare.
I spend most of my time programming so I don’t include many textures in MappingBoard.
With Textures
- The ground textures used in this map were created by David Gurrea.
- The water texture was created by AbsoluteCross.
- Based on the map in the Rapid Fire scenario Operation “Quick Anger” by Mark Piper, Link no longer working.
Using a Texture
Once you have downloaded a texture you can use it straight away in MappingBoard, many however, are too big. It is a simple matter to shrink them down to between 100×100 and 200×200 pixels depending on the texture and the size of your maps. To resize using MS Paint, open the image, select the Image->Attributes… menu item and select the requires width and height. keep the texture seamless you need to resize both height and width by the same fraction. Most seamless textures are square so this shouldn’t be difficult to calculate.
Features:
- Most terrain features can be created in one step.
- Objects freely moved and adjusted once created so you don’t have to get it exactly right first time.
- The terrain feature template is an easy to edit xml file.
- Features added via right clicking an object on the map.
- You can add drawing styles (e.g. pen and fill colour) AND whole features (e.g. a kidney shaped hill).
- This allows you to draw items in your terrain collection once and add them to each map with just a couple of clicks.
- Terrain features have a draw order so that e.g. roads, always drawn over other features*
- Linear features with borders will merge borders when overlapped (e.g. see road junctions in example)*
- Features such as woods can be made semi-transparent allowing them to overlap hills.
- Easy to use military unit symbols.
- Square and Hex grids.
- UN obstacle symbols such as concertina barbed wire.
- NEW: Blended image fills to give soft edges to the terrain * for performance reasons this occurs during export to an image file but not when editing.
There is no documentation at the moment so you’ll just have to play with it and see if you like it. I will, however, list important features here.
Selecting Objects
- Once you have several objects on the map it is sometimes difficult to select the object you want.
- Use layers to organise your objects. E.g. place all hills on one layer, roads on another etc. Too many layers, however, can make it difficult to find the object you want to select.
- By default clicking will select the top most object, if you hold the shift key down you can toggle through all the objects in the current layer under the mouse.
Transparency
- Area terrain (e.g. woods) filled with a solid colour, a tiled image, or both if you use a gif image with transparency.
- If both, the alpha setting will set the transparency of the solid colour only, otherwise it will set the transparency of the tiled image.
“3D” Terrain
Coming soon – how to draw 3D terrain.
Miscellaneous
The map its drawn on the editing screen with a small margin. This margin will not appear on the exported image so features, drawn across the map border without having to spend precious time trying to line the end of the feature up with the edge of the map.
Drawing Styles
You can draw either free hand (the default) or by sets of straight lines.
Features in the Pipeline
- Arrowheads and other line terminators
- Preview screen – showing a fully WYSIWYG version of the map.
Downloads
- Download the latest installation package (version 0.9.1.1, dated: 22/12/10).
- Download the previous version (version 0.9.0.1).
Documentation
Jim Baker, from Fire and Fury, has written a user manual.
Support
For questions about MappingBoard, user submitted content and to report bugs please visit the MappingBaord Yahoo! Group.
System Requirements
- A PC running Microsoft Windows XP or later
- The DotNet framework version 2.0. This is probably already on your machine otherwise you can download it from here.
Installation
- Download the zip file and unzip the contents in a suitable place.
- Double click Setup.exe and follow the instructions to install.
Known Issues
Sources
- MappingBoard
- Matthew Tyler
- Rob Robbins
- David Gurrea
- AbsoluteCross
Other blog categories that may be of interest. 10mm ACW Project, 10mm AWI Project, 10mm AZW Project, 10mm CGW Project, 10mm FIW Project, 10mm Sci-Fi Projects, Aliens, Dropzone Commander, Terra Nova, 10mm WWI Project, 10mm WWII Project, 10mm Zombie Project, Battle Reports & Scenarios, Making Scenery & Terrain, Painting Guides, Shows & Events, Solo Wargaming, Wargaming Projects, Wargaming Rules.
Leave a Reply