
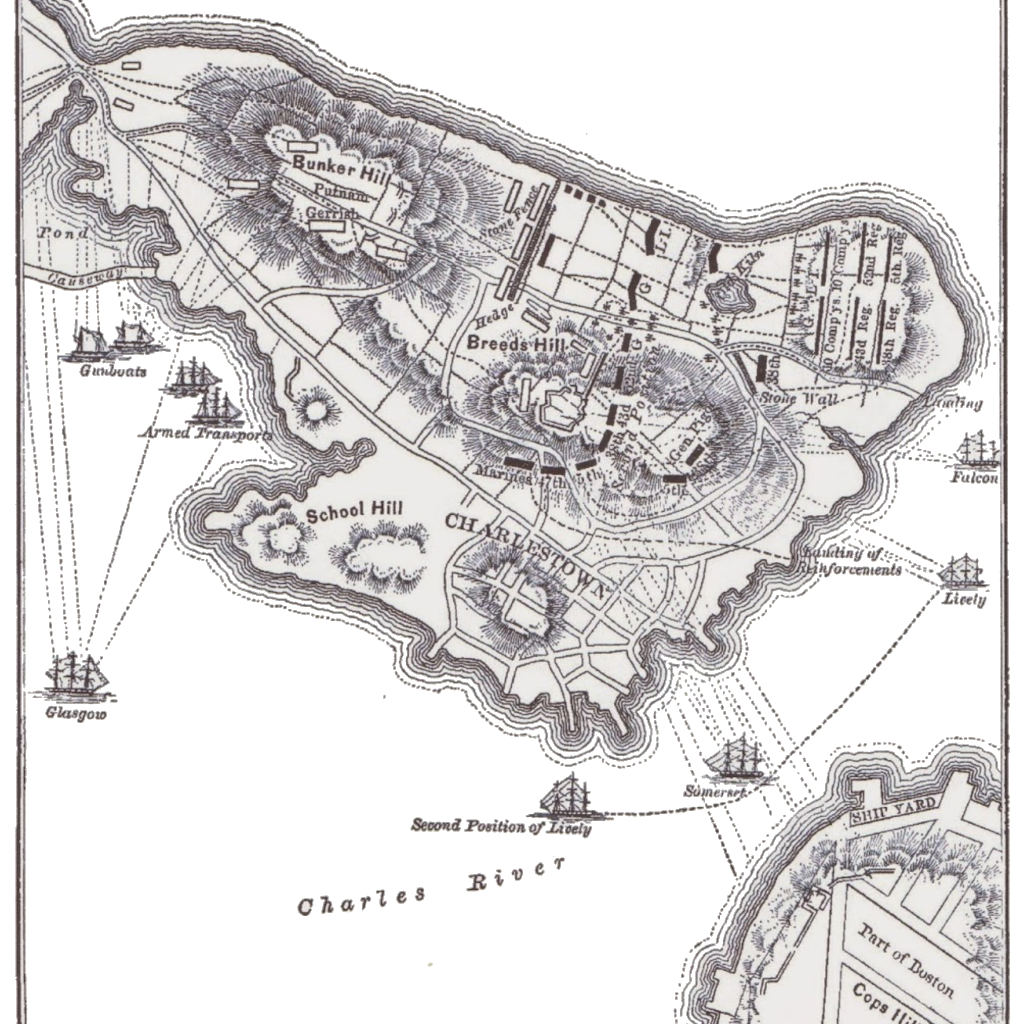
The Battle of Bunker Hill took place on 17th June 1775, during the early stages of the American Revolutionary War. It was fought on the Charlestown Peninsula near Boston, Massachusetts, primarily on Breed’s Hill, which is often mistakenly referred to as Bunker Hill.
The battle began when American colonial forces learned that the British planned to fortify the hills surrounding Boston. In response, about 1,200 colonial troops under the command of William Prescott stealthily occupied Breed’s Hill and constructed a strong redoubt overnight. By dawn, the British were aware of the colonial presence and launched an attack.
The British forces, led by General William Howe, made three assaults on the colonial positions. The first two assaults were repulsed with heavy British casualties, but the third assault succeeded after the colonial forces ran out of ammunition. The Americans were forced to retreat, leaving the British in control of the peninsula.
Although the British technically won the battle, it was a Pyrrhic victory. They suffered 1,054 casualties, including many officers, while the Americans incurred around 450 casualties. The battle demonstrated that the inexperienced colonial militia could stand up to the professional British troops, boosting the morale of the American forces and encouraging the revolutionary cause.
The Battle of Bunker Hill was a significant early engagement in the American Revolution, showing that the conflict would be long and hard-fought. It also led the British to adopt a more cautious approach in future battles, avoiding direct frontal assaults against well-defended positions.
Orders of Battle
American Orders of Battle
- American Commander-in-chief William Prescott
- 1st Brigade, under the command of Israel Putman’s
- William Prescott’s Massachusetts Regiment (250)
- Fyre’s Massachusetts Regiment (250)
- Bridges’s Massachusetts Regiment (250)
- Israel Putman’s 3rd Connecticut Regiment (200)
- Massachusetts Artillery
- 2nd Brigade, under the command of Stark’s
- John Stark’s 1st New Hampshire Regiment (300)
- Reed’s 3rd New Hampshire Regiment (300)
- Massachusetts Artillery
- 3rd Brigade, under the command of
- David Brewer’s Massachusetts Regiment (150)
- Jonathan Brewer’s Massachusetts Regiment (150)
- Little’s Massachusetts Regiment (150)
- Whitcomb’s Massachusetts Regiment (150)
- Dolittle’s Massachusetts Regiment (150)
- Sargent’s Massachusetts Regiment (150)
- Reed’s Massachusetts Regiment (150)
- Woodbridge’s Massachusetts Regiment (150)
- Massachusetts Artillery
British Orders of Battle
- British Commander-in-chief William Howe
- 1st Brigade, under the command of Robert Pigot
- Clark’s Light Infantry (300)
- Abercrombie’s Grenadiers (300)
- 5th Regiment of Foot (320)
- 38th Regiment of Foot (320)
- Royal Artillery
- 2nd Brigade, under the command of Henry Clinton
- 43rd Regiment of Foot (320)
- 52nd Regiment of Foot (320)
- Light Infantry (80)
- Marine Battalion (160)
- Grenadiers Battalion (80)
- 3rd Reserve Brigade, under the command of
- 47th Regiment of Foot (320)
- 1st Marine Battalion (400)
- Copp’s Hill Battery 3 x 28 pounders
- Royal Navy Support, under the command of Samuel Graves
- HMS Somerset
- HMS Glasgow
- HMS Lively
- HMS Falcon
- 2 Floating Batteries
- Armed Transport Symmetry
Download This Scenario
How it Played
Sources
Other blog categories that may be of interest. 10mm ACW Project, 10mm AWI Project, 10mm AZW Project, 10mm CGW Project, 10mm FIW Project, 10mm Sci-Fi Projects, Aliens, Dropzone Commander, Terra Nova, 10mm WWI Project, 10mm WWII Project, 10mm Zombie Project, Battle Reports & Scenarios, Making Scenery & Terrain, Painting Guides, Shows & Events, Solo Wargaming, Wargaming Projects, Wargaming Rules.
Leave a Reply